
How to Identify an Excavator Monitor Before Ordering
August 15, 2026 · XAVORNIK Editorial Team
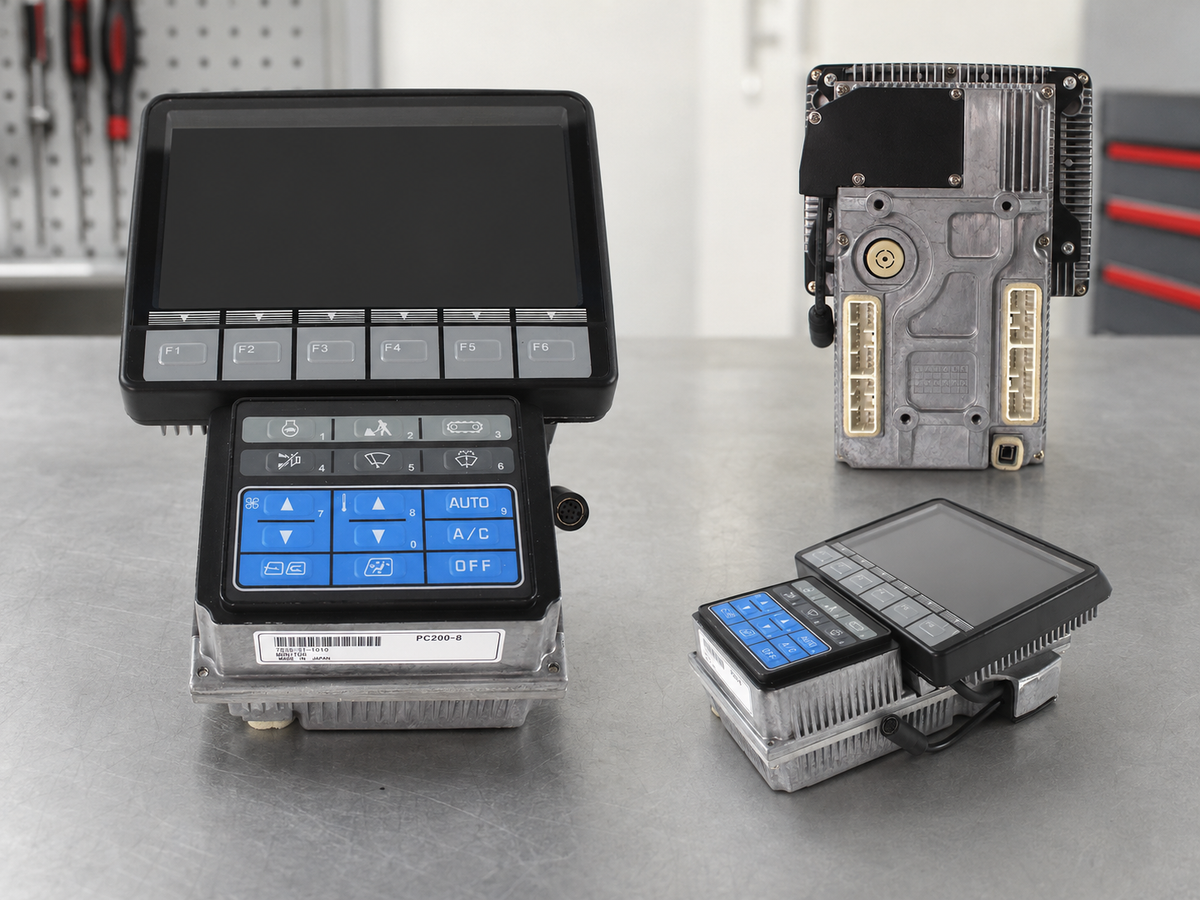
Replacing an excavator monitor is not as simple as matching the machine model printed on the side of the excavator. Two machines that look almost identical can use different monitor assemblies because of production year, serial-number range, electrical configuration, connector layout, software version or later parts supersessions.
Before ordering a replacement display, the safest approach is to identify the monitor from the machine and the original unit itself. This guide explains the information that should be checked and photographed before a replacement monitor is selected.
Why excavator monitor identification matters
The monitor is part of the machine's electrical and electronic system. Depending on the equipment, it can display operating information such as engine status, temperatures, pressures, fuel level, warnings, service information and diagnostic messages. Some monitor assemblies also interact with machine settings or electronic control systems.
For this reason, physical similarity alone is not enough. A replacement monitor may have the same general shape and screen size but still be unsuitable if the connectors, pin configuration, mounting points, voltage range or application software do not match the machine.
Manufacturers themselves distinguish monitor assemblies by part number and machine configuration. Caterpillar, for example, lists different operator monitors with different connector arrangements and software conditions. This is why the original part number and machine information should always take priority over appearance.
1. Find the original monitor part number first
The most useful identification reference is the part number on the original monitor. Before removing the old unit, inspect the rear housing, side label or identification sticker and record every visible number.
Do not rely only on a number found in an online listing or on a similar machine. The number physically installed on the excavator gives a much stronger starting point for verification.
When taking a photo of the label:
- Clean dust or oil from the label carefully.
- Photograph the entire label in focus.
- Take an additional close-up of the part number.
- Keep any serial, model, hardware or software information visible.
- Do not crop away surrounding housing details that may help identify the unit.
If the original part number has been superseded, a replacement may carry a different number. A supersession should be verified from reliable parts information rather than assumed from appearance or seller descriptions.
2. Record the complete machine model and serial number
Machine model is important, but it should not be used by itself. Record the complete model designation and the machine serial number or product identification number from the equipment nameplate.
For example, a monitor may be listed for several excavator models, but that does not mean every production configuration of those models uses the same monitor. Manufacturers can change electrical components during a model's production life, and machines may also have been modified or retrofitted after leaving the factory.
A strong fitment check therefore uses at least two independent references:
- the original monitor part number; and
- the machine model plus serial or product identification number.
If these references conflict, stop and verify the application before ordering.
3. Compare every connector, not just the number of plugs
Connector verification is one of the most important physical checks. Different monitor assemblies can use different connector counts, pin counts, keying positions or pigtail arrangements.
For example, official Caterpillar parts information shows that some operator monitors use 6-pin and 12-pin connectors, while other display monitors use combinations such as three 12-pin and two 6-pin connections. Other monitor groups may use an 8-pin pigtail or a single high-pin-count connector. These differences can determine whether a monitor can connect to the machine harness at all.
Photograph the rear of the original monitor and check:
- number of connector sockets;
- pin count for each connector;
- connector shape and keying;
- socket position and orientation;
- pigtail length, if present;
- locking tabs and guides;
- any additional video, antenna or communication ports.
A connector that looks similar in a small product photo may still be different. Close-up comparison is much safer.
4. Check the housing and mounting points
Next, compare the monitor housing with the original unit. Important details include:
- overall housing shape;
- front bezel dimensions;
- mounting hole locations;
- mounting brackets or threaded inserts;
- rear housing depth;
- button arrangement;
- screen orientation;
- location of plugs and cable exits.
Even when the electrical connector is compatible, an incorrect housing or mounting pattern can prevent proper installation in the operator cab.
If dimensions are available, compare them with the removed monitor. However, dimensions should be treated as a secondary confirmation rather than a substitute for part-number verification.
5. Confirm operating voltage and electrical configuration
Heavy equipment monitor assemblies are designed for specific electrical systems. Before installation, confirm that the replacement monitor's rated operating voltage and electrical configuration match the machine.
Do not attempt to make an incompatible monitor work by altering connectors or repinning the machine harness unless the modification is supported by the correct technical documentation. Incorrect wiring can damage the monitor or other electronic components.
If there is any sign that the machine harness has been repaired, modified or replaced previously, photograph the machine-side connectors as well as the monitor.
6. Determine whether the monitor requires programming or application software
This is an important check that is often missed when buying replacement excavator displays.
Some monitor assemblies are supplied with application software installed, while other display units may be supplied without application software. Official parts listings for different Caterpillar monitor assemblies demonstrate both conditions. Therefore, two physically compatible displays are not automatically equivalent from a software standpoint.
Before ordering, determine whether the replacement is:
- ready to install with the correct application software;
- pre-programmed for a specific machine or application;
- programmable but requires machine information before shipment; or
- an unprogrammed display that requires configuration after installation.
For programmed replacement monitors, the seller may need the machine model, serial number, original part number or other machine information before programming. Provide accurate information and confirm what has been programmed before installation.
7. Do not identify a monitor from the excavator model alone
A common purchasing mistake is searching only for terms such as “320D monitor” or “excavator display for 312C.” Model-based searches are useful for finding candidates, but they should not be the final fitment decision.
The same monitor part number may cover multiple machines, and a single machine family may use more than one monitor depending on configuration. Manufacturer fitment tools also warn that changes from the original equipment configuration can affect compatibility.
Use the machine model to narrow the search, then verify the exact part number, serial range, connector configuration and software requirement.
8. Understand replacement, alternate and remanufactured part numbers
Construction equipment parts catalogs may show an original number together with alternate, replacement or remanufactured numbers. These relationships can be useful, but the type of relationship matters.
An alternate number should not automatically be treated as an identical plug-and-play replacement. Verify whether the alternate part requires a different harness, software configuration, mounting hardware or additional installation procedure.
When an aftermarket monitor references several numbers, compare those references against the original unit and the machine information before purchase.
9. Send clear photos when the part number is missing or unreadable
Older monitors often have damaged or missing labels. If the part number cannot be read, identification may still be possible from a complete set of machine and product photos.
For the best chance of accurate verification, provide:
- machine nameplate;
- complete machine model;
- machine serial or product identification number;
- front view of the original monitor;
- rear view of the original monitor;
- close-up of every connector;
- side views showing housing depth and mounting points;
- any remaining labels or stamped numbers.
One front-facing photo is usually not enough for a professional fitment check.
10. Use a pre-order verification checklist
Before placing the order, confirm the following:
- Original part number: Does the replacement reference the number on the existing monitor?
- Machine information: Have the full model and serial/product identification number been checked?
- Connectors: Do connector quantity, pin count, shape, keying and position match?
- Housing: Do dimensions, mounting points and bezel configuration match?
- Electrical system: Is the operating voltage appropriate for the machine?
- Software: Is programming required, and if so, has the correct machine information been supplied?
- Replacement relationship: If the part number differs, has the supersession or alternate relationship been verified?
What information should you send XAVORNIK?
If you are unsure which replacement monitor is correct, send the information below before ordering:
- original monitor part number;
- excavator make and full model;
- machine serial number or product identification number;
- clear photo of the original monitor front;
- clear photo of the rear housing;
- close-up photos of all connectors;
- any known information about previous monitor or harness replacement.
Our team can use these details to compare the replacement monitor with the information available for the part. Final fitment should always be confirmed against the machine's actual configuration before installation.
Final takeaway
The safest way to identify an excavator monitor is to combine the original monitor part number with the machine's model and serial information, then confirm the physical connectors, housing, electrical specification and software requirement. Appearance alone is not a reliable fitment method.
Taking a few extra photos before ordering can prevent many common replacement mistakes and makes technical verification much more efficient.